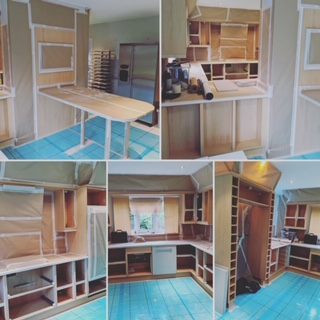
One of our most frequently asked questions is ‘What preparation is involved before you spray our kitchen?’ The key to a successful kitchen spray is in the preparation and a lot of customer underestimate the work that goes into this.
Prior to the Kitchen Spray Day
Step 1 – The Plan
Before our team attend to spray a job sheet is completed which details how we will tackle the kitchen in the least disruptive and most efficient way for ourselves and you the customer. We will assess the layout, the space, the material we will be spraying, whether it will be beneficial to complete the whole kitchen spray on site or complete half of the kitchen spray at our bespoke spray booth. Every kitchen has its own plan and when you have sprayed over 350 kitchens the planning becomes more and more efficient each time.
Step 2 – The Instructions
We will always leave a set of instructions if there are tasks to do prior to our arrival. This usually involves the emptying of all the kitchen cupboards and drawers. At times there may be additional advisories which will always be noted on the agreement. These instructions will then be visible to the sprayers so they are fully informed regarding the whole process.
Kitchen Spray Day
Step 3 – Removal of Cupboards & Drawers
When the team arrive the first step is to remove all the kitchen cupboards, drawers and hinges (if spraying the full internal carcasses). Each of the removable items are numbered so that when the kitchen is being put back together nothing goes a miss. We bring special racking so all the doors are kept together in a compact fashion. There are occasions that we will remove the doors and bring them back to our spray booth if it is a large kitchen. All handles are removed and also numbered.
Step 4 – Masking the kitchen
This is the longest task that the team will complete they will create meticulous lines and ensure that there is no overspray anywhere.
Anti static, dust attracting, plastic sheeting will cover any large appliances, sofas etc. Blue sticky film covers the floor. Brown paper is used to ensure all work surfaces, tiles, splashbacks, built in appliances and cooker hoods are covered and masking tape to ensure that all the lines are straight.
Step 5 – Scotching the Kitchen
All surfaces that require spraying must be scotched to key the surface and allow the coating to bond. This is not the same as sanding it leaves less hazing and scratching than sand paper.
Step 6 – Cleaning the Kitchen
We use panel wipe to clean the surface. This is a superb cleaner which ensures the final removal of surface contamination. We do ask the customer to clean any stubborn grease and grime prior to our arrival.
The preparation process usually takes around 70% of the time we have allocated to complete the kitchen spray. The above process must be completed correctly to provide the customer with a 10 year guarantee on fading, cracking and peeling.


